Final Frontispiece
Originally published on Tony's blog May 12, 2009
I delivered the last original colored image to the Spiderwick series today to the art director. Sure, there are a TON of pen & ink drawings still needed for the interior of the final book, but the colored frontis (done in the style of old fairy tale books) is finished, that means no more new colored Spiderwick art…wow, the end is near.
I am feeling a bit nostalgic as I approach the finish line on my work for Spiderwick. It has been a long and glorious adventure with much more highs than lows. I have a game plan for doing the interior art too: I will intentionally repeat compositions I have done already for the series so that it may act as a bit of a reprise – and I’ll start with the colored frontis.
In truth, the frontispiece has always been very important to me. It is usually conjured early on from Holly’s first draft, and is an image which may be too complicated for the immediacy required of the cover. I believe its function is to entice and intrigue the reader now that they’ve actually picked the book up and are looking inside. But the image has also shown a bit of my personal journey as well. Take, for instance, the frontis to book 1: The Field Guide:
 Sure, its Jared looking at the portrait of Arthur Spiderwick in his secret study. BUT it is also me, as a young artist, shining a light on my hero Arthur Rackham (whom Spiderwick was modeled after). I remember when I finished this image that I knew Holly and I had created something special in this little faerie world. Here’s the frontis to book 2: The Seeing Stone:
 That’s Holly and I fighting off the fast-growing excitement (and subsequent pressure) of the success of the books. This was also done very early on in the history of the series, but already there was a lot of buzz at Simon & Schuster for the books – we were certainly on our way.
So for this last frontis, I wanted there to be something special and personal for me, that would bring everything around in a big circle. I returned to one of the first finished pieces I did for (what would become) Arthur Spiderwick’s Field Guide, a “Blue Finned Sea Maid” from around 1994. Incidentally, this was part of the presentation I had created for TSR to see if they would be interested in making the book – as fate would have it, they were not.

I’ve done merfolk off-and-on for gaming over the years. Here are a couple that I’ve always liked:

“Merfolk of the Pearl Trident”, a Magic: the Gathering card done in 1997. My brother, Adam, posed for this holding a broom. Here’s another, more Rackhamy, image…

…done in 1998, probably for Dungeon Adventures magazine. These two fellas are not as cleverly designed as the others, but they are less static and show the movement one would want in an illustration of a mermaid.
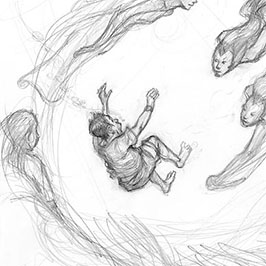
With all of that in mind, I did my first sketch of the frontis for The Wyrm King, doodled right on the front of Hol’s manuscript:

Next post, I’ll show how I refined the drawing and began the inking process…
With my thumbnail approved by the team at S&S (and Holly), I was off to refine the sketch and prepare it for finish. For that, I began looking at reference of swimmers photographed underwater, like this image from LIFE magazine:

Immediately I was struck by how wonderful the light refracts through the ripples onto the pool walls and the swimmer’s body. This was great inspiration to me. Energized, I redrew the image and began to hone the composition. Below is the thumbnail sketch redrawn:

Some have observed that the pen & ink illustrations in the Spiderwick chapter books are rendered a little different than say, how I would paint a book jacket, or even the “natural history-esque” plates of Arthur’s Field Guide.
For these books (and my picture books), I use more of an animator’s approach: I study life, collect reference, but draw the scenes from my mind so that the characters are a touch cartoonish. I feel this exaggeration helps them convey their emotion better from the 5 x 7 inch stage of the illustration in the book.
Speaking of, I have the border that I use for the Spiderwick books as a template in Photoshop. Once I find the sketch I like, I drop it into this template and continue to rework the composition.
 Here you’ll see that I’ve not only nudged our hero, Nick, up in scale, but moved him so that he overlaps the ring of mermaids. This helps to create a sense of depth in the image. Also, I’ve begun to add some tonal fields (which are really nothing more than notes to myself) as I continue working.
I mirror flip the art around in Photoshop, correcting any errors I find. I then size the piece (here 11 x 14 inches) and print it out on bond paper.
Next, I’ll transfer it to bristol board and prepare it for inking…
I continue my progress on inking the final colored frontispiece for The Spiderwick Chronicles finale, The Wyrm King…
My desk is actually a light table. Its large size allows me to transfer images onto the Bristol board which I use for most all of my artwork. Here is a shot of my desk with the frontispiece in progress. Also present is some of the reference used in this final drawing stage.

First off, you’ll notice Arthur Spiderwick’s Field Guide (ASFG). I am referencing the mermaid designs so that these are continuous with the look of the story. Also present is the last S’wick book, A Giant Problem, in which I illustrated only bobbing heads. In this new illustration, we will now see the merfolk in all of their underwater glory, and you’ll be able to match faces from Giant Problem to faces here in The Wyrm King. Lastly, the paper behind ASFG is the printout sketch that I refined and sized on the computer.

This shot shows how the lines transfer from the rough sketch and get detailed and reworked as I prepare for inking. Nick has simply been traced and slightly refined, while the mermaids are almost complete. All of this is done simply with a #2 Ticonderoga pencil.

Here the final drawing is almost completed. I’ve also added lines to aspects of the image that will only be dictated in color, such as the ocean surface and the light rays. Note that forms are drawn through others to continue their lines correctly, even off of the border.

Here’s a detail of the mermaids’ faces. Though they are individuals, they are rendered as one formation to retain the sweeping movement of the composition.

And here is a detail shot of Nick. Unlike the fluid, dynamic shapes of the merfolk, Nick’s arms and legs are sprawled out in a clumsy (helpless turtle) pose as he drifts to the ocean floor.
As I’ve mentioned before, the basic shapes are in place and SOME of the details are worked out. However, I’ve purposely left room for me to render with the inks only. Simply tracing perfect pencil lines creates a static, non-energized line for me. I have to do some of the final spontaneous drawing with the pen.
Next stage: inking. Including a warm-up study courtesy of Mr. Rackham…
Before I begin inking my image for the frontis to The Wyrm King, I am going to do a quick warm-up to get reacquainted with my pens. I strive for a lively, loose pen line to maintain an energy in my ink drawings. Before I begin any final inkwork, I do a small, simple exercise to get in my grove.
Usually, these warm-ups are non-commissioned pieces for the project – that way there’s no pressure on me if they don’t come out well. Oftentimes, I copy a master in order to pick up a thing or two which may help me with the image at hand. For the mermaids in my piece, I’ve been studying Arthur Rackham’s amazing illustrations from Siegfried & The Twilight of the Gods (1911) and The Rhinegold & The Valkyrie (1912) which have been conveniently bundled together by Dover Publications in Rackham’s Color Illustrations for Wagner’s “Ring”.
 I found a nice image of Sieglinde drugging someone’s drink (p. 20). Her profile was classic Rackham, and a perfect image to study. Here you see my quick pencil reproduction. This is likely much larger than the size Rackham would have worked at.

I am putting in underlying anatomy that I know I won’t ink. It still helps me to understand the form so that I can chose what is important to ink, and what to leave for the eye and brain to fill in.

I use FW inks for everything. For the Spiderwick books I use black India. In the past, though, I have used burnt umber – which is likely what Rackham used, especially if he planned on coloring the image after. A deep brown would settle into the washes, possibly even emulsifying a bit, and would look less like a cartoony outline.

This study, and most of the illustrations I do in ink, are rendered with a Hunts 102 “crow quill” nib. It can draw a beautiful, delicate line but also has a lot of pluck – which I like. I save the older, worn nibs so that they may be used for thicker linework.

I keep a scrap of board nearby to scribble out and get the ink flowing. I also use a damp paper towel to keep the nibs clean. I usually scrape off the dried ink with a blade before I begin.

Here’s the pencil drawing inked. I used Rackham’s image as my guide for what to ink, and what to leave untouched. Especially when drawing women, the more lines you give them, the older they appear.

I erase the pencil lines and scan the image as a bitmap (at least 600 dpi). From here, I would do clean up and all fixes in Photoshop. In the past, I would have used gobs of China white paint to white out areas for re-inking, or simply patched in a new piece of Bristol (which Charles Gibson often did). Thankfully, those days are behind me.
Next up: Time to ink the final!
PS: It looks like the Rackham book by Dover is out-of-print. However a quick search for his name on the Dover site brought up several other books chock full of great Arthur Rackham art (and at an affordable price).
PPS: while you’re there, check out this awesome inkmaster of the past: The Drawings of Heinrich Kley
I conclude today the inking process for the frontispiece to the final Spiderwick book, The Wyrm King.

After my warm up on the Arthur Rackham study, I was ready to begin inking. I started with Nick, who is not only the hero of the books, but the focal point of this image. That means if I was to blow it on inking him, I’d likely start over – so its better to get him finished first.

Just like the pencil work on the Rackham study, there are lines here that won’t be rendered in ink (like the flush on his cheeks). Satisfied for the moment, I move onto the much more complicated mermaids.

Like I mentioned earlier, the cluster here has to act as one. However, I’ve put in details (like different hair color and texture) to differentiate them upon closer inspection.

Here is the full piece in progress. At this point I’ll move onto the remaining mermaids and then the aspects of the environment. The watery surface won’t be done in inks – I’ll save that for the watercolors.

When I feel the inking is complete and ready for color, I scan the image so that it can be used for an interior illustration as well.
This method follows what was traditionally done with old woodcut/black & white illustrated fairytale books: One of the eye-catching interior pieces was colored and tipped in (a process where the color printed image was hand-glued into the book). Often, it accompanied the title page at the beginning of the book (hence, a “frontispiece”) and created excitement and intrigue for the story right at the start.
What’s interesting about my “to-be-colored” inked images is that they are not always rendered in a rich gamut of varying gray tones. In fact, if you browse through the other Spiderwick books (especially book 1), and compare the colored frontis to its black & white counterpart, you’ll note that the linework is little more than contoured outlines. It looks like there is a little bit of that going on here with this image too. So, for the final black & white inked interior illustration, I will add more linework in Photoshop to give the art a sense of depth and finish. However, for its initial use as an inked drawing that needs color, it is ready to go.

With my reference handy of underwater swimmers, I was able to finish the image with watercolors. I’ve been using Yarka watercolors on all of the Spiderwick chapter books, and really like how the colors glow when I glaze them in layers. I’ll go into a step-by-step on how that is done in future post…
…In the meantime, I’ll get to tweaking the scanned inked image for the final book interior illustration and share that with you once it is done.

 Menu
Menu Connect